Rube Goldberg-class Engineering Project
| Maps on Shiptest | |
| Independent | Beluga, Box, Bubble , Dwayne, This ship is admin-spawned Junker , Kilo, This ship is admin-spawned Lagoon , Mudskipper, Riggs, Schmiedeberg, Shetland, Sunskipper, Tranquility
This ship is admin-spawned |
| Inteq Risk Management Group | Colossus, Valor, Vaquero, Talos |
| Nanotrasen | Delta, Gecko, Meta, Mimir , Osprey, Ranger, Skipper, This ship is admin-spawned Heron
This ship is admin-spawned |
| Pan-Gezena Federation | Crying Sun |
| Pirate/Frontiersmen | Jupiter , This ship is admin-spawned Tortuga
This ship is admin-spawned |
| Solar Confederation | Chronicle, Inkwell, Paracelsus |
| Saint-Roumain Militia | Elder |
| The Syndicate | Hyena, Kansatsu, Komodo, Li Tieguai, Panacea, Twinkleshine
This ship is admin-spawned |
| Removed/Deprecated | Aegis, Asclepius, Boyardee, BYO, Carina, Caravan, Cepheus, Cricket, Corvus, Ember, Glaive, Kugelblitz, Lugol, Luxembourg, Libertatia, Pill, Rube Goldberg, Shepherd, Solar, Sugarcube, Tide, Vela |

|
Removed
This ship has been completely removed from the game files. |
Gustus Amort, an engineering graduate student, received a grant to design a mass produced industrial engineering vessel for an independent contractor. The student did exactly what they had been taught in school, with no foresight into the industry of real shuttle design. Due to heavy budget constraints, Gustus frequently visited impounds, ship graveyards, and junkyards alike. Instead of spending any amount of the budget on the hull, Gustus decided instead to spend the vast majority of it on the equipment loaded onto the ship, as well as the vast amounts of fuel carried in its pressure tanks. The project was completed by chance when Gustus Amort happened to find several different ships and welded them together to form the hull, before filling it to the brim with all the equipment he could buy.

Gameplay
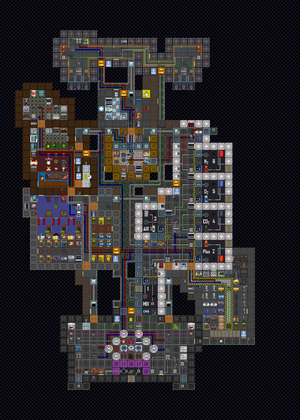
The Rube-Goldberg Class is a ship focused around giving engineering players as much content to work with as possible. The ship contains, but is not limited to:
- An SM shard (Don't unlock and open the crate first thing.)
- A particle accelerator.
- A tesla ball generator.
- A full TEG setup.
- Numerous circuits for machines.
- A hunting rifle.
- A steering wheel.
- Fuckloads of gas in each atmos container.
- Full equipment for any atmos tech or engineer.
- Lots of space within the maintenance halls for expansion, as well as a large engine room for projects.
- Secrets.
The gameplay usually revolves around upgrading and building machines, while filling in the gaps in the ship. The ship also comes with full instructional guides to running the ship, in the form of holotapes found around the ship and in the central bronze walled office.
What Roles?
The roles that can be selected aboard the Rube-Goldberg Class are as follows:
- 1 "Chief at Engineering" - A CE/captain like position given to the ship purchaser.
- 1 "Chief at Boozineering" - Bartender role.
- 2 "Engineering Specialist" - Engineer role.
- 2 "Atmospheric Specialist" - Atmospherics Technician role.
- 1 "Medical Specialist" - An all around medical doctor role.
- 2 "Mining Specialist" - Mining role.
How do I get this thing operational?
When you start off on the Rube-Goldberg, the first thing you want to do after getting suited up with all your tools is set up atmospherics, then power, then thrusters. After you do that, it's up to you how you spend your time on the ship, as it supports the creation of loads of engineering projects. The following guide will help you set up the ship to start:


- Put on a hardsuit and turn on your internals.
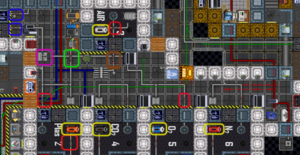
- Fig. 1 - Wrench down and turn on all cannisters squared in yellow.
- Fig. 1 - Turn on and max all pumps squared in red.
- Fig. 1 - Turn on the pump squared in brown but don't adjust pressure.
- Fig. 1 - Turn on the pump squared in green and set it to 500kpa.
- Fig. 1 - Turn on and max the mixer squared in pink.
- Fig. 1 - Turn on the pumps squared in blue and set them to 2000kpa.
- Fig. 1 - Unlock the air alarm, open up the scrubbers menu, turn scrubber 1 to siphon and extended range.
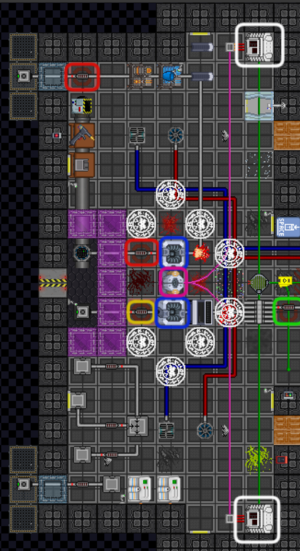
- Fig. 2 - Screwdriver the two machines squared in blue. Multitool them until the top is set to "Hot Loop" and the bottom is set to "Cold Loop", then screwdriver them both again.
- Fig. 2 - Wrench the machine squared in purple.
- Fig. 2 - Turn on the pump squared in green and set it to 1000kpa.
- Fig. 2 - Turn on the pump squared in yellow and set it to 850kpa.
- Fig. 2 - Grab a welding tool, turn it on, put it in the disposals unit next to the wooden table, and activate the disposals.
- Fig. 2 - Wait for the burn chamber to catch fire entirely.
- Fig. 2 - Turn on and max both pumps squared in red.
- Fig. 2 - Set both APCs squared in white to max input, and 100 output
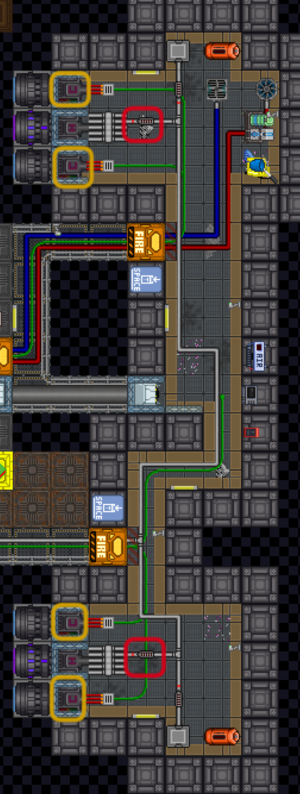
- Fig. 3 Turn on and max both pumps squared in red.
- Fig. 3 Turn on and set input to max on all the thruster chargers squared in yellow.
External Links
https://shiptest.net/maps.html - Shiptest website map viewer
